Wednesday, August 15, 2012

A Sneak Preview of New Quilt Pattern, an August Winner and Hillbilly Art from Jarbidge


A New Pattern in the Works!  I’ve been promising a preview of my newest quilt design that I plan to release this month, which is presently untitled (maybe I should run a little name contest?).  Many of you know by now that I love applique, and I made this design deliberately simple with a repeating motif for those of you who haven’t got your feet wet yet in applique.  I hand-appliqued the borders, but this can also be accomplished on your home sewing machine with a zig-zag stitch and invisible thread.  The pattern will contain instructions for both methods and also how to complete the “echo” stitching around each motif in the borders using the big-stitch quilting method. Stay tuned for details on the release of this pattern . . . .


We Have a Winner!  Diane Green of Chagrin Falls, Ohio, is the August Birthday Club Winner, and she has chosen my “Slice of Pie” pattern for her prize.  Congratulations Diane, and good luck to everyone next month when another winner will be drawn.  If you want to join the American Pie Birthday Club for a chance to win free patterns, just drop me an email at melanie@americanpiedesigns.com.


How About that Art . . .   I introduced the beginning of my Hillbilly Art Collection on this blog yesterday. Last weekend, hubby and I went on a Jeep trip with friends to Jarbidge, Nevada, and we had such a hoot!  Jarbidge is an old mining town near the Nevada/Idaho border that is now becoming a tourist destination. There are at least two places in Jarbidge where you can purchase scrumptious homemade jams and jar cakes, and the town is full of unusual antiques and memorabilia. The food is generally bad and the accommodations almost fair, but the beauty of Jarbidge lies in its quaintness, history, unusual architecture and uh, Hillbilly Art.

My jaw dropped at this first example.  Yes, you're seeing right--that’s an official HANDICAPPED PARKING ONLY sign planted firmly in front of the Jarbidge Post Office. Although Jarbidge boasts only a single dirt road down it's middle, I wouldn't dream of parking in front of this sign, particularly since the town sheriff lives just two doors down . . .


I found this next shot on our way back from Jarbidge in a town called Glens Ferry.  You might have to gander for a moment to truly appreciate what you're seeing. Yes, you are correct, that's a hedge made of bowling balls!  I reflected that the nearest bowling alley was at least three hours away and the balls, each weighing 10 to 18 pounds, had probably been hauled in the back of a pickup truck to their final destination.  Now that's Hillbilly Art . . .


That's it for today.  I'm back to my worktable dreaming up some new rug hooking designs and a candle mat for fall.  Hope you are having a great summer, and Happy Stitchin'!   xoxo--Melanie

Tuesday, August 14, 2012

Hillbilly Art and Chocolate Praline Cake-in-a-Jar!

The new “thing” I’m stuck on is cake-in-a-jar recipes.  Have you tried them yet?!  You make these little humdingers in wide-mouth canning jars, which means they are portable for your hubby’s lunch or for potlucks and barbecues.  I’m going to be posting several cake-in-a-jar recipes over time, and most of these little treats will store for several weeks in your pantry and several months in the freezer.  I love reaching into my cupboard and pulling out a little jar of cake before I settle in for the late show‑‑yum!

This recipe, “Chocolate Praline Cake-in-a-Jar”, is borrowed from the Potter Recipe Club.  The original version was created by Elizabeth Kisch from Pensylvannia, who won first place and $10,000 bucks in a cake contest back in 2002.  You’ll see why Elizabeth’s cake won when you try this great recipe for yourself:


Chocolate Praline Cake-in-a-Jar
(makes 10 to 12 servings)

You Will Need:
  • 10 to 12 half-pint canning jars with rings and lids
  • A rimmed baking sheet or roasting pan to hold the jars during baking

For the Cake:
  • 8 tablespoons (1 stick) unsalted butter, softened
  • 1-1/2 cups packed light brown sugar
  • 2 large eggs
  • 1 teaspoon pure vanilla extract
  • 6 tablespoons unsweetened cocoa powder
  • 1-1/2 teaspoons baking soda
  • 1/4 teaspoon salt
  • 1-1/2 cups sifted cake flour
  • 2/3 cup sour cream
  • 2/3 cup brewed coffee (you can use leftover coffee from breakfast!)

For the Praline Topping:
  • 2 tablespoons unsalted butter
  • 3/4 cup firmly packed light brown sugar
  • 1/2 cup water
  • 1 cup powdered sugar
  • 1/2 cup pecan halves or pieces

Here We Go!  Preheat your oven to 350°F.  Place the canning jars on the rimmed baking sheet and set aside.  In a large bowl, beat together the butter, brown sugar and eggs until fluffy, about 2 minutes.  Add the vanilla, cocoa, baking soda and salt and mix until combined.  Add half of the flour and half of the sour cream and mix until combined.  Repeat with the remaining flour and sour cream.  Drizzle in the coffee and mix until smooth.  The batter will be thin, like heavy cream.  Pour the batter into the jars, filling them about half way.  Bake until the tops of the cakes are firm to the touch, approximately 25 minutes.

For the topping, melt the butter in a medium saucepan over medium heat.  Add the brown sugar and water and stir with a wooden spoon until the sugar is dissolved, 2 to 3 minutes.  Remove from heat and stir in the powdered sugar until combined, and then return the mixture to the heat and bring to a boil.  Stir in the nuts.  Working quickly (because the praline hardens as it cools), pour the praline topping over the cakes to cover.  Allow the cakes to cool completely and then screw on the jar lids.  The cakes can be kept for several days at room temperature.

Hillbilly Art

Here in Idaho, we have a lot of what I fondly refer to as “Hillbilly Art”.  We’re a mostly agricultural state brimming with cattle, homemade pies and county fairs.  In some parts, you can drive for a couple hours and see nothing more than a gas station and a greasy spoon café.  Small towns with beautiful names like Bliss, Sugar City, Garden Valley and Sweet dot our landscapes, and with so much work to do on our farmlands, people here tend to stay home and create their own, uh, art.

A few examples come to mind, unfortunately on days when I didn’t have my camera.  For example, I once came upon a deer made from logs with tree limbs for the legs and antlers.  That wouldn’t be unusual except for the fact that the farmer perched it on the roof of his house so you could see it from the highway.  Or the time I happened upon an elk’s skull painted with psychedelic colors and peace signs and wired to the front of an old Volkswagon bus (would love to have that come up behind me on the highway).  My recent favorite was a van on its way to a wedding which bore the words “Honk for Bridesmaids; Moon for the Bride”.  Ah, Idaho art.

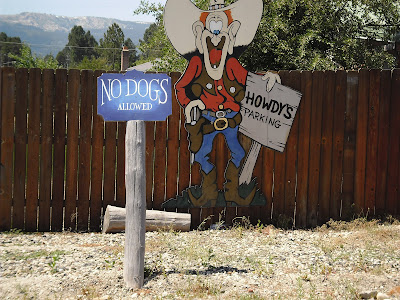
I have simple rules for something to be included in my Hillbilly Art collection.  First, it’s tacky.  Second, I can’t respond other than sucking in my breath and whispering “Geeeesh”.  My first photo for this week hails from a gas station in Cascade, Idaho.  I was stunned by the sign that read “No Dogs Allowed”.  Perhaps the landscaping had been done by some local folks?  Maybe the Cascade Chamber of Commerce pitched in?  I seriously doubt a dog might leave something here that could damage the scenery.  Geeeesh . . .


That’s it for now.  Stay tuned for more exciting Hillbilly Art from a trip to Jarbidge, Nevada, a sneak peak at my new quilt pattern coming very soon, and another great cake-in-a-jar recipe.  In the meantime, Happy Stitchin’!   xoxo--Melanie

Tuesday, July 17, 2012

Do You Love Halloween?!


I love to decorate my home with Halloween and autumn themes, don’t you?  Although summer is my season of choice, it is a wonderful change when the fall air starts to crisp at night and the days are still warm and sunny. To celebrate, I created “Jack-and-the-Cat”, an autumn and Halloween hooked rug pillow that is featured in the fall issue of Primitive Quilts and Projects Magazine!


With this issue, you’ll get the FREE PATTERN, instructions and template, along with about 15 other wonderful projects by some of your favorite designers, including Kim Diehl, Jennifer Gaston, Dawn Heese and Tonya Robey (Mad Hen Designs). This issue will be available at your favorite quilt stores in a week or so and on newsstands in the first week of August.


If you’re like me and want your very own subscription to Primitive Quilts and Projects Magazine, just click here and be sure to mention Melanie Pinney or American Pie Designs when you subscribe and you’ll get an EXTRA ISSUE FREE!


ARE YOU A MEMBER OF MY BIRTHDAY CLUB?  I hope you’ll join!  Members receive a WHOPPING 25% OFF ALL PATTERNS AND KITS DURING THEIR BIRTHDAY MONTHPlus, a winner is drawn each month from all Club members with a birthday that month and the winner receives their choice of a free pattern from my website. It’s sooooo easy and costs you absolutely nothing ‑‑ it’s just my want of saying “thank you” to all my friends.  To join, just click here, or you can also email me your name, address and birthday month and I'll get your added.

SO WHO IS JULY’S BIRTHDAY CLUB WINNER? Congratulations go to Cynthia Brian of Kiowa, Kansas!  Cynthia, please visit my website at www.americanpiedesigns.com and email me with your choice for your free pattern. Everyone else who is a Birthday Club member and is a July birthday baby will be shortly receiving an email from me with a special code for 25% off all my patterns and kits for the rest of this month. Happy Birthday everyone!

That’s it for now ‑‑ be sure to check back in a couple of days when I post a new recipe and a sneak preview of my new quilt that has an easy checkerboard center and happy flower-filled borders you can applique by hand or by machine. Easy-peasy and so fun to make!  In the meantime, Happy Stitchin’!  xoxo--Melanie 

Wednesday, June 13, 2012

Meet the June Birthday Club Winner and make Lemon Cupcakes with Blackberry Buttercream Icing!


It's time to announce the June winner from the Birthday Club! Drum rolls and congratulations go to Jo Leland of Kingwood, Texas, who wins a free pattern of her choice from my website!


Jo is a member of my American Pie Birthday Club, and I hope you'll join too.  It's free and each month all Club members get a chance to win a pattern and also get 25% off all patterns and kits from my website during their birthday month! If you haven't joined yet, click here or send me your name, address and birthday month at melanie@americanpiedesigns.com and I'll get you entered. Good luck to all!


What's New?  I've been working on a new traditional quilt pattern that will be ready for release in the next two or three weeks.  It's a great pattern for both beginning and experienced quilters and in addition to some simple quilt blocks, it showcases a bit of applique in the borders that you can do by hand or machine. The great thing about this pattern is it shows my easy secret for choosing fabrics to achieve a planned scrappy look. I know choosing fabrics is one of the most difficult parts of making a quilt, but if you follow the instructions in this pattern, you'll find it really simple to harmonize your fabrics perfectly.  More on that soon!


Let's get to my favorite part -- Food!  I found this wonderful recipe for lemon cupcakes with blackberry buttercream frosting and I'm making a [second] load of them to enjoy with family and friends for our annual Fourth of July barbecue.  This recipe was a hit with the hubby, who packed them into his lunchbox and greedily pilfered them during the late movie while I snoozed.  I hope you enjoy this recipe.  Please feel free to share it with your friends!


Lemon Cupcakes with Blackberry Buttercream Frosting
(recipe courtesy of allrecipes.com)

Ingredients for Cupcakes (makes 24 cupcakes):
  • 1 cup white sugar
  • 1/2 cup butter
  • 2 eggs
  • 1-1/2 teaspoons vanilla extract
  • 1-1/2 cups all-purpose flour
  • 1-3/4 teaspoons baking powder
  • 1/2 cup low-fat milk
  • 1 lemon, juice and zest
  •  
  • Ingredients for Frosting:
    1 cup butter, softened
  • 1 teaspoon vanilla extract
  • 1/4 teaspoon salt
  • 4 cups confectioners' sugar
  • 1/2 cup seedless blackberry jam

Directions:
  • Preheat oven to 350 degrees F (175 degrees C)
  • Line 24 muffin cups with paper liners
  • Cream sugar and 1/2 cup butter in the bowl of a stand mixer until fluffy. Beat in eggs, one at a time, and mix 1-1/2 teaspoons vanilla extract into mixture with the second egg.
  • Beat in flour and baking powder until thoroughly combined; beat in milk, lemon juice, and lemon zest to make a smooth batter
  • Spoon the batter into the prepared muffin cups
  • Bake in the preheated oven until cupcake edges are slightly golden brown and a toothpick inserted into the center of a cupcake comes out clean, 20 to 25 minutes. Cool cupcakes completely
  • Beat 1 cup butter with 1 teaspoon vanilla extract and salt until smooth and creamy. Beat in confectioners' sugar, 1 cup at a time, to make a creamy frosting. Beat in blackberry jam. Spread frosting on cooled cupcakes.

That's it for today!  I'm headed back to my worktable to continue working on that new quilt pattern.  Have a great week, and Happy Stitchin'!  xoxo--Melanie

Monday, May 14, 2012

Celebrate Spring with "Peppermint Patty" and Lemon-Sugar Bundt Cake!

Mmmmm, I love peppermint and I love lemon too, so we're going to have a little of both today!  I thought it would be fun to show you my new crochet pattern and follow it up with a wonderful recipe I have for Lemon-Sugar Bundt Cake.

Are you as eclectic as I am?  I love to jump from one kind of project to another, so in between the patterns I've been creating for fall and the new summertime candle mat I'm working on, I couldn't see any reason not to get "Peppermint Patty" finished!


"Peppermint Patty" is a super-fun crochet hat pattern I created during a long road trip with my hubby.  It's available through my Etsy shop at http://www.etsy.com/shop/lollypoppers, and you can get it in full-color downloadable PDF format or by paper pattern through snail-mail. The pattern includes complete instructions and some extra tips that are good for any crochet project (a teaser page is shown below):


And how about that recipe for Lemon-Sugar Bundt Cake? This cake is incredibly delicious and just right for spring and summer entertaining. It's moist and sweet and tangy and supposedly keeps for several days, although it is always gone at my house before I can find out!

LEMON-SUGAR BUNDT CAKE

I originally found this delicious recipe at www.melangerbaking.com and it's become a favorite. If you want, you can double this recipe to suit the larger volume of a 10-inch bundt pan which you bake at 350F (180C) for 40-45 minutes.  The regular recipe shown below can be baked in an 8-inch round cake tin or a 4"x8" loaf pan for 25-30 minutes. This recipe is also delicious substituting orange or lime for the lemon.  Here we go!

Ingredients for Batter:
2 sticks (250g) butter, room temperature
4 tablespoons lemon zest (about four lemons)
2 cups sugar
6 eggs
1-1/2 cups whole milk
3 cups all purpose flour
1-1/2 tablespoons baking powder


Ingredients for Syrup:
3/4 cup of lemon juice
3/4 cup of sugar


Directions:
Preheat the oven to 180C (350F). Beat the milk and eggs together in a small bowl. Set aside. Sift the flour and baking powder in a separate small bowl. Set aside. In a large saucepan, combine the butter and sugar on low heat until melted. Whisk in half of the milk/egg mixture until loosely blended. Whisk in half of the flour mixture. Repeat in the same order with the remaining mixtures, finishing with the flour. Gently stir in the lemon zest and then pour the batter into your prepared pan.  Bake as directed above or until a toothpick inserted in the center comes out clean. Transfer to a wire cooler.

Immediately begin preparing the syrup. Bring the lemon juice and sugar to a boil in a small saucepan. Using a toothpick, poke a few holes around the cake, and then drench the cake with the hot syrup.  Allow the cake to cool in the pan, and then gently remove it. If you keep the hubby away, this cake keeps well for 3-5 days stored at room temperature in an airtight container.

It's back to the worktable for me  With any luck, I'll have a new summer candle mat ready for you to enjoy in a few days. As always, have a great week and Happy Stitchin'!

xoxo--Melanie

Monday, May 7, 2012

Introducing "Fall Is In The Air" and a Recipe for "Easy Rhubarb Crisp"!

I hope you like my new release, "Fall Is In The Air", a cute 34" x 34" quilt you can make from wool or wool felt!  I like to think of this as a cheater quilt, because not a single piece is done by sewing machine.The block sections are cut, temporarily attached with washable fabric glue, and then stitched together with a simple embroidery stitch called the blanket stitch.  Because we're cheating, your points and seams will come out perfect!


The pattern is $9.99 and I've included diagrams for each of the 16 blocks, full-size templates for the lettering and leaves, a color photograph and illustrations explaining the simple embroidery stitches used to embellish the quilt.  You can make this quilt from wool or wool felt, and I've even created a kit containing all the wool felt you need to complete the quilt, in case your local fabric store doesn't carry all the colors.  You can see a close-up of the quilt and more information by clicking here.


How About a Recipe for Memorial Day Coming Up?  My husband thinks all I do is stitch, but boy, is he wrong!  In between 4-wheeling, snowmobiling, dangling a worm from a hook and stitchin', I also like to cook now and then.  I really enjoy taking special foods along when we go  crappie fishing over Memorial Day weekend, and with that in mind, I want to share a recipe straight from hubby's heart called . . .


"EASY RHUBARB CRISP


THE CRUST AND TOPPING:
1 cup quick oatmeal     
1 cup brown sugar
Pinch of salt
1/2 cup butter
1/2 cup chopped walnuts (optional) (gotta have nuts!)
Mix together the oatmeal, 1 cup of sugar and pinch of salt.  Add the butter and cut it in until it resembles course crumbs.  Divide the mixture in half.  Press half into a 9" x 13" pan to create the "crust". Set the other half aside for now.


THE YUMMY FILLING:
              
4 to 6 cups rhubarb, chopped
1 to 1-1/2 cups sugar

PUTTING IT TOGETHER Mix the rhubarb and the 1 to 1-1/2 cups sugar.  Spread the mixture evenly over the "crust" you created above.  Sprinkle the remaining crust/topping mixture over the top, adding chopped nuts, if desired.  Bake at 350 degrees for 45 minutes.  I like to serve it warm with vanilla ice cream.  Mmmmm!

I've got to get back to my worktable now.  I'm working on a couple of new projects I want to get released in time for everyone to finish their's for summertime decorating.  Have a great week, and Happy Stitchin'!  xoxo--Melanie


Tuesday, May 1, 2012

Are You the April Birthday Club Winner?

April showers have certainly given way to May flowers, at least in my part of the world in the western United States!  Many of you have taken advantage of the American Pie Birthday Club, and if you haven't joined yet, I hope you do!  All Club members who are April and May birthday babies will receive a special email in the next few hours that will contain a code to RECEIVE 25% OFF ANY PATTERNS OR KITS THEY ORDER BETWEEN NOW AND MAY 31, 2012.  If you haven't joined yet, you can either click here or simply email me your name, address and birthday month at melanie@americanpiedesigns.com and I'll get you entered.  Then when your birthday time comes around, you'll get a code for 25% all patterns and kits during your birthday month!


Now it's time to announce the April Birthday Club winner!  Each month I put all the members' names in for a drawing for a free pattern of their choice from my website.  The April winner is Becky Strosnider of Indiana.  Congratulations Becky!  Please visit my website at http://www.americanpiedesigns.com and let me know which pattern you choose!


That's it for now!  I'm finishing up the last touches on a new pattern release, "Fall is in the Air", which I'll be posting about very shortly, and there's a new summertime candle mat on my worktable I hope you're gonna love!  In the meantime, Happy Stitchin'!  xoxo--Melanie

Sunday, April 29, 2012

A Sneak Preview of "Fall is in the Air"

With only four months until you can begin enjoying your autumn/fall decorations (can that be true?!!), I want to introduce a sneak peak of my newest design, "Fall is in the Air", a 34" x 34" wall or table quilt. This design will be available this week as a pattern or easy wool felt quilt that you can make from beginning to end in about 21 days of evenings and weekends, or much quicker if you don't have a day job and like to watch daytime soap operas while you stitch!


The stitches are easy (using only the blanket stitch, "x" stitch and running stitch, and I'm including diagrams so you can complete them on your own (they are sooooo fun!). "Fall is in the Air" has eight different blocks (each of them repeated twice), including the Log Cabin, Mosaic, Twelve Triangles and other favorite blocks.  They are created using simple applique, so you don't have to worry if your cuts are a little off.  And since we're using wool applique and not real "seams" for this quilt, you don't have to worry about making sure your triangles and points are perfect!


It's topped off with a great border and fall oak and maple leaves . . .


and I've included the templates for the lettering (of course)!

You can win this pattern if you're a member of my Birthday Club (and I do hope you'll join!), or you can get 25% OFF if it's your birthday month.  Just click here for details about the Birthday Club.  If you're already a member, be sure to check email this week to see if your name was drawn as the lucky winner of a free pattern of your choice from my website! Many of you have taken advantage of the Birthday Club, and it's not too late to get your name in for our drawing this week. If you're confused or have trouble signing up, just send me your name, address and birthday month (melanie@americanpiedesigns.com) and I'll get you entered!

Well, it's back to the worktable for me!  I'm creating a new candle mat that is rich and wonderful and you can finish in about a week of evenings and get it out on your table in time for the hot days of summer!  Please always feel free to leave a comment or email me if you have any questions--I'm usually available most weekdays, unless my hubby has put a fishing pole in my hands!  In the meantime, Happy Stitchin!  --xoxo, Melanie
 

Thursday, April 19, 2012

New Designs on their Way!

You might be wondering why I'm designing Halloween patterns when it's spring in most of the world? Who wants to work on fall and autumn projects when the flowers are just coming up? We do!  Fall is only four months away (can you believe it?!?), so it's not too early to get stitchin' on a beautiful runner or penny rug to grace your table when summer gets tired. I apologize for not posting recently, but with deadlines for a wholesale show coming up, I was running a little behind. That said, I want to introduce my newest design, "Halloween", which is an 18" x 30" table runner or penny rug you can make from hand-dyed wool or wool felt . . .


This project is so easy to make and I've included complete templates for all the pieces and simple illustrations for the three decorative embroidery stitches used in the pattern. The pattern includes eleven photographs and diagrams to help you complete your runner. As you can see, I used wool felt for the model, which is easy to find at either your local fabric store or in a kit that I offer on my website. I've been posting about the fun I've had working with wool felt from National Nonwovens. They make wool felt in around 100 different, rich colors and blends. You can use wool felt straight off the bolt or you can  "felt" it to make it look like expensive boiled wool. If you'd like instructions on how to make wool felt look like boiled wool, check out "Tips for Working with Wool Felt", which is a full-color printable instruction sheet I created just for wool felt.


Don't forget, if you're not already a member of my Birthday Club, I hope you'll join! You'll receive a WHOPPING 25% OFF ALL PATTERNS AND KITS DURING YOUR BIRTHDAY MONTH Plus, a winner is drawn each month from all Club Members with a birthday that month, and the winner receives their choice of a free pattern from my website! It's easy to join and costs you absolutely nothing--it's just my way of saying "thank you" to all my friends.  If you don't want to use the Birthday Club link above, just email me your name, address and birthday month and I'll get you enrolled.


What's coming up next?  I'm working on one last design for autumn and it's a doozie! I expect to have the model and pattern finished by next week. I can't post pictures of it yet (it's in too many pieces on my worktable!), but I can tell you it will be a beautiful 34" x 34" wall/table quilt in rich, brilliant shades of burnt orange, yellow, berries/plums and fall greens. This is another design you can make from wool or wool felt that you can stitch on when you travel or if you have some quiet time in the evenings. More about that pattern next week!

I've got to get back to my worktable now, but want to wish you a good weekend and Happy Stitchin'!    xoxo--Melanie

Monday, April 2, 2012

Announcing the Birthday Club Winners!

It's already April--can you believe it?  All the April birthday babies who are Birthday Club members already received a special email early this morning which contained a code to receive 25% off everything on my website.  If you haven't joined yet, you can either click here or simply email me your name, address and birthday month at melanie@americanpiedesigns.com and I'll get you entered.

Now it's time to announce the January, February and March Birthday Club winners!  Each month I put all the members' names in for a drawing for a free pattern of their choice from my website.  Since the Birthday Club didn't get started until late this year, I pulled THREE names from the hat, and they are LaKay Bergin, Mary Linderud and Denise Boyce.  Congratulations ladies!  Please visit my website at http://www.americanpiedesigns.com and let me know which pattern you choose!

That's it for now.  I've got to head over to my Pinterest Page and add some yummy images I've been hoarding all weekend.  In the meantime, Happy Stitchin'!  xoxo, Melanie

Friday, March 30, 2012

Tips and Tricks for Working with Wool Felt


It never fails:  I pick up my sketch pad to begin a new design and am torn between using the lovely hand-dyed wools that hang on my color wall or pulling from the rich colors of wool felt next to my work table. Each has its own benefits and drawbacks, and I know I'm not the only person out here who has trouble choosing.

What's the Difference Between Working with Wool or Wool Felt?  When I buy hand-dyed 100% wool, it comes to me pre-felted. That means the wool was placed in a warm or hot bath and then dried (usually in a dryer).  If you know anything about 100% wool, you know that causes it to shrink or "felt" as the industry calls it.  The "felted" wool can now be cut for rug hooking, quilts, applique templates and just about anything, because it can no longer fray.  That's wonderful, because you now don't have to worry about hiding or turning the edges under, which opens up a whole world of possibilities.

There are many advantages to using 100% wool, and the most important are (1) unlimited color possibilities and natural mottling variations, (2) durability, and (3) it is washable. Once wool has been properly felted, you don't have to worry about further shrinking, so you can wash it and give it a little steaming to return your project to brand new. The main disadvantage is hand-dyed 100% wool is expensive and can ultimately run $30 to $50 a yard depending on where you get it. However, if I am working on an heirloom project that I want to last for 300 years,  then 100% wool is my choice.


Wool Felt is a Whole New Game!  Here in the United States, wool felt is primarily manufactured by National Nonwovens.  There are many retail distributors of wool felt, one of which is Commonwealth Felt and another is Wool Felt Central.  The wool felt I use is a 20/80 or 35/65 blend of wool and rayon.  Its advantages are (1) it is inexpensive and runs only $8 or $9 a yard or about $1.75 for a 12x18" sheet, (2) it comes in near 100 colors, (3) it is already felted, and (4) it can be made to look like expensive "boiled wool".  Unfortunately, wool felt should not be put in a washing machine and it's not suitable for projects that will get heavy use in your home, like a bed quilt or a hooked rug.  However, wool felt is great for table runners, candle mats, wall quilts, penny rugs, etc!

I've created an easy printable tutorial sheet called Tips for Working With Wool Felt  I hope you enjoy.  It shows you how to make your felt look like "boiled wool" (if that's how you want it), how to use it in projects and how to care for your wool felt.  There's lots of information on the tips sheet, so please feel free to share it with your friends or even pass the link forward.  I think you are going to love working with wool felt!

If you haven't joined my Birthday Club yet, don't forget I'm drawing three names early next week for the January, February and March Birthday Club winners! It's free to join and you get big discounts and can win free patterns during your birthday month.  Several of you birthday babies have already taken advantage of their membership to purchase kits for my "Snow Days" and "Halloween Jacks" designs and they are shipped and on their way to you!  My new design for a Halloween table runner is done and I'm working on the pattern and a kit I know you'll like, which should all be finished and ready for shipping in the next few days.  I take the photos outdoors and will get the photography done as soon as it stops raining (geez, I mean if it stops raining).  Remember, you'll be able to pick up the pattern and kit for 25% off during your birthday month if you're a Birthday Club member.

That's it for today.  I've got my brain full of another idea I want to get started on over this weekend if the hubby doesn't decide we're going four-wheeling or fishing.  I can never decide if I like fishing or stitching better--are you the same way too?

Until next time, Happy Stitchin'!  --xoxo Melanie

Monday, March 26, 2012

"Rainbow Sherbet" and Tips for Working with Wool Felt!

I know many of you have been waiting for "Rainbow Sherbet", my new pattern for a cute crocheted hat you can make in your choice of bright and cheery colors. Well, the pattern is ready(!) and you can make this hat with only two simple crochet stitches.  I've included instructions on how to make the flowers and leaves (in both U.S. and United Kingdom versions) and how to make both children and adult sizes. There are also extra lessons on what yarns to buy, a special section with a unique method on changing yarn color and other helpful information:


The pattern is available by snail mail for $6.99 plus $1.10 shipping or by PDF digital download for $5.00.  You can get the pattern through my newest store on Etsy called Lollypoppers, or you can email me at melanie@americanpiedesigns.com and I'll send you the details.

UPDATE ON THE BIRTHDAY CLUB:  There's been overwhelming response to my new American Pie Birthday Club, and if you're not already a member, I hope you'll join!  You'll receive 25% OFF ALL PATTERNS AND KITS DURING YOUR BIRTHDAY MONTH!  Plus a winner is drawn each month from all Club members with a birthday that month and the winner receives their choice of a free pattern from my website.  It's easy to join and is my way of saying "thank you" to my friends.  Don't worry, I'll send all Birthday Club members an email about their 25% discounts during their birthday month.

Since the Birthday Club got started in March, I'm still honoring all January and February birthday babies with the same 25% discount and a chance to win a pattern.  That means that THREE people (one for January, one for February and one for March) will win a free pattern. Names will be drawn on Tuesday, April 1.  Just click here to become a member!


NEW HALLOWEEN TABLE RUNNER:  The new Halloween table runner pattern is nearly finished and I love it!  I'm taking the model to some friends today to ask their opinion on whether it needs further embellishing. Criminy, I've tried to make this decision on my own by looking at the model close up, from six feet away, with and without my glasses, etc., and I'm getting nowhere.  I plan to have the printed pattern finished by the end of the week and, of course, I'll have wool felt kits available so you don't have to run all over town looking for materials!


TIPS FOR WORKING WITH WOOL FELT:  I promised more information on tips for working with wool felt, and that information is nearly ready to post.  I'll provide important tips on how to make wool felt look just like "boiled wool" (but at a fraction of the price!), how to create templates from wool felt for applique, care and cleaning of your finished projects, dyeing wool felt and other information.  I'll post that information later this week, so be sure to check back or join this blog for automatic updates. 


That's it for today--I'll post again on Wednesday.  In the meantime, Happy Stitchin'!  --xoxo, Melanie

Friday, March 23, 2012

Wool Felt: Do You Love it Too?

I first believed my love for wool felt would be a flash and I'd move on to something else, but I really love working with it.  My last two patterns can be made with wool felt and a new design on my worktable is made entirely with wool felt.  Pair that with an idea I'm chewing on for a table quilt using wool felt and fabric, and I'm permanently hooked.  If you've never worked with wool felt before, you should consider playing outside the regular sandbox and give it a try.  There are good reasons to try wool felt:
  • Wool felt is easy to get.  You can order it with an easy click or two through Commonwealth Felt and your order arrives in a few short days.  Commonwealth Felt is the retail outlet for National Nonwovens, the wholesale manufacturer of wool felt in the United States.
  • It is NOT expensive.  A 12"x18" piece costs only about $1.79.
  • It comes in a gazillion colors and you can choose 100% wool felt, a couple different wool blends, acrylic, and even bamboo felt.
  • With a little care, It is cleanable.
  • It doesn't take up a bunch of space in your work area.  I have nearly 100 different colors that fit nicely into a small plastic drawer on my worktable.
  • It is fun and easy to work with! There's no fraying with wool felt, so it opens up a whole new world of applique ideas.


It used to be a lot of quilters hated applique, but no more! Applique doesn't have to involve  endless turning-under of raw edges and tiny, finicky stitches.  With wool felt, all those problems disappear and you are free to attach your shapes with a simple running stitch, blanket stitch or whatever other embroidery stitches you love.  Don't you agree that using wool felt on a quilt can give it a wonderful, quaint charm or a primitive look, depending on how it's used?

I use two different blends of wool felt interchangeably in my designs, a 20/80 wool-rayon blend and a 35/65 blend.  I can't tell the difference, unless I want to wash it to get the "boiled wool" look.  In that case, I use the 35/65 blend.  I'm always torn between washing the felt or leaving it smooth, because I love both looks equally. If you take a look at the following pics, you'll see wool felt right from the package . . .

and then washed, which gives it the bumpy texture that looks like "boiled wool", but at a fraction of the cost . . .

I think you'll find that using wool felt is very easy.  For most applique projects, trace your shapes onto the smooth side of freezer paper from the grocery store.  Iron the freezer paper onto the wool felt and cut out your shapes on the traced line (the waxy side will temporarily stick to the wool, but can be peeled away without leaving a residue). Cut out your shapes on the traced line and position them on the background with pins or a bit of washable fabric glue.  Now you're ready for the fun part--attaching the shapes to the background with a running stitch, whip stitch, primitive stitch or your other favorite stitches.  I use common embroidery thread because I happen to have tons of it around, but you can also use DMC perle cotton threads or hand-dyed wool threads if you want a different look.  Look at this beautiful pic I borrowed from the work of Marianne Byrne-Goarin that shows you what can be done with wool felt . . .


I'll post a full-color printable tutorial on using wool felt in a few days that will show you how to wash your wool for the bubbly "boiled wool" effect, how to care for your finished project and lots of other information on wonderful wool felt.  I hope you'll think about giving it a try!

In the meantime, Happy Stitchin'!  -- xoxo, Melanie